Returns and refunds
The Sales app offers multiple ways to handle product returns. The correct method depends on whether the customer has already been invoiced.
Before invoicing
If a customer returns a product before an invoice is issued or confirmed, the return is handled using Reverse Transfers.
Note
The Inventory app must be installed to process returns using reverse transfers.
To begin:
-
Open the Sales app.
-
Select the relevant sales order.
-
Click the Delivery smart button to access the related delivery order.

On the validated delivery order, click Return.
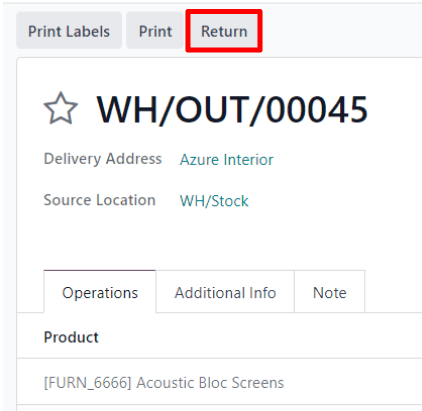
A Reverse Transfer window will appear.
-
The default quantities match what was delivered.
-
Adjust quantities if needed.
-
Remove items using the 🗑️ (trash) icon.

Click Return to confirm. This creates a new warehouse operation for the returned items.

Once the returned goods are received, the warehouse team validates the operation by clicking Validate.
After validation:
-
The Delivered quantity on the sales order is automatically updated.
-
It reflects the original delivery minus the returned items.

When an invoice is later created, the customer is billed only for the products they kept.
After invoicing
If a return happens after the invoice has been issued or paid, additional steps are required. Since confirmed invoices cannot be modified, a combination of Reverse Transfers and Credit Notes must be used.
Start by opening the relevant sales order in the Sales app.
If a payment has already been registered:
-
Payment details will appear in the chatter.
-
The invoice will show a green In Payment status.

Step 1: Process the return
-
Click the Delivery smart button.
-
Open the validated delivery order.
-
Click Return.
Update product quantities as needed, then confirm by clicking Return.
This creates a return operation, which must be validated by the warehouse team once items are received.
After validation, the Delivered quantities on the sales order are updated accordingly.
Step 2: Issue a refund
To refund the customer:
-
Open the invoice using the Invoices smart button.
-
Click Credit Note.
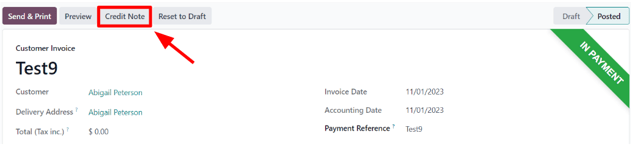
This opens the credit note form.

Fill in the required details:
-
Reason displayed on Credit Note
-
Journal
-
Reversal Date
Then choose one of the following:
-
Reverse: create a credit note only
-
Reverse and Create Invoice: create a credit note and a new draft invoice
Make any necessary adjustments, then click Confirm.
Once completed, a notification appears indicating that available credits can be applied to settle outstanding invoices.